MySQL database backup

Once in a while we all need to keep backup of all the MySQL databases in our system. We can easily do that with mysqldump, but one small issue with mysqldump is that it generate a dump of all databases into a huge single file. Here i’ll show you how to keep backup of every database in separate file using the same tool. I will breakdown the process in steps.
In step 1 i will generate a list of available database and save them in a file called db-list.txt
In step 2 i will read the database name from that file (db-list.txt) one by one and generate a sql dump for that database.
Let’s do it.

Step 1:

mysql -u root -p -e "show databases" > db-list.txt

Step 2:

for /f %a in (db-list.txt) do (mysqldump -u root -p %a > %a.sql)


Xdebug with PhpStorm on Windows 10

Tools Required:

  1. XAMPP
  2. Xdebug extension
  3. PhpStorm

Steps:

1. Download & Install XAMPP (from here)

2. Download correct Xdebug extension file (from here) and configure your php.ini (xampp\php\php.ini) file with the following lines

[xdebug]
zend_extension=php_xdebug-2.5.5-7.1-vc14.dll
xdebug.remote_enable=1
xdebug.idekey=PHPSTORM

NOTE: You need to restart your apache after modifing the php.ini file.

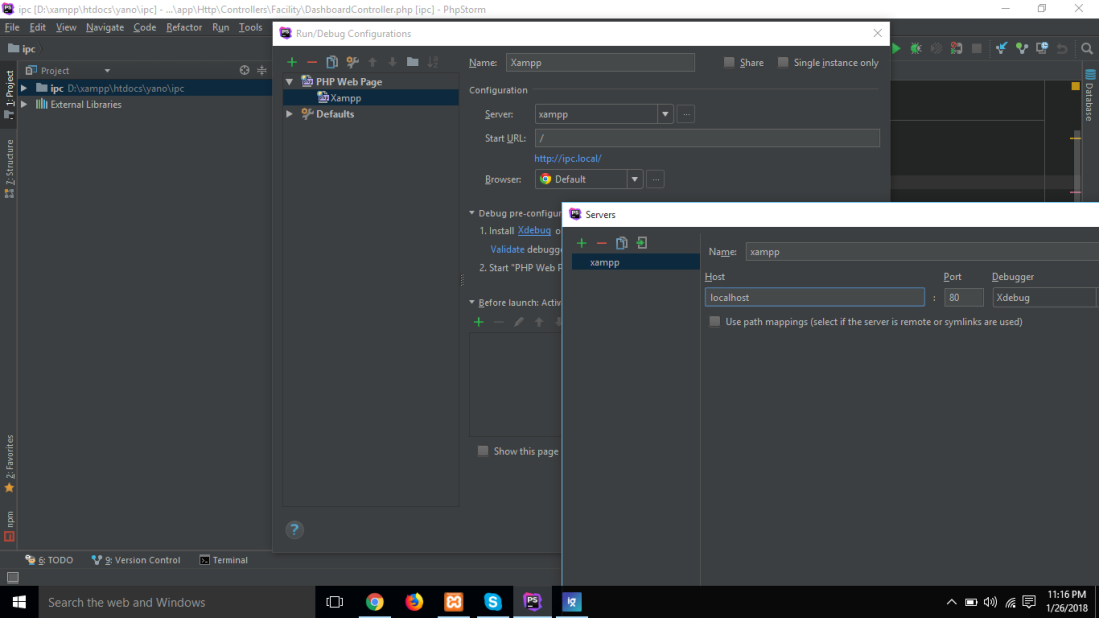
3. Download & Install PhpStorm ,then create a php project. To debug that php project you need to configure the IDE (PhpStorm). To configure Click on the PhpStorm’s menu and select Run->Edit Configurations…, a new window will pop, and in that window click the add(+) button and select Php Web page, and fill the form.


Zend Framework 2

Step 1 – Composer

I wrote this step in a separate post which is here.

Step 2 – The Skeleton Application

In order to build our application, we will start with the ZendSkeletonApplication available on github. Use Composer (http://getcomposer.org) to create a new project from scratch with Zend Framework:

php composer.phar create-project --repository-url="https://packages.zendframework.com" -s dev zendframework/skeleton-application path/to/install

NOTE: replace the path/to/install with your intended project path (eg. demo_app).

After executing this command, it will download the skeleton application with all its dependency like the Zend Framework 2. It might take some time depending on your internet speed. keep patience!

NOTE: After installing the skeleton application, you will see one more composer.phar inside it. From now on we will be using this composer.phar

Step 3 – Virtual Host

See how to create a virtual host from here.

Step 4 – Zend Framework Tool (ZFTool)

ZFTool is a utility module for maintaining modular Zend Framework 2 applications. It runs from the command line and can be installed as ZF2 module or as PHAR (see below). This tool gives you the ability to:

  • create a ZF2 project, installing a skeleton application;
  • create a new module inside an existing ZF2 application;
  • get the list of all the modules installed inside an application;
  • get the configuration file of a ZF2 application;
  • install the ZF2 library choosing a specific version.

Requirements:

Zend Framework 2.0.0 or later.

PHP 5.3.3 or later.

Console access to the application being maintained (shell, command prompt)

Installation using Composer

php composer require zendframework/zftool:dev-master

This command will install the ZFTool inside the vendor/zendframework/zftool directory. Now we can use this tool with this command

php vendor/zendframework/zftool/zf.php

OR you can just download the PHAR package and use it. In that case you don’t need to install it with composer.

Suppose we want to see the list of modules in our project, we can do this by this command:

php vendor/zendframework/zftool/zf.php modules

You can read more about ZFTool usage commands from this link https://github.com/zendframework/ZFTool

Step 4 – Module

Zend Framework 2 uses a module system to organize application specific code within each module. Inside the skeleton application there is a directory called module. Inside the module directory we see a directory called Application (module), the skeleton application by default creates this module.

Let’s create a module named Album using the ZFTool. To do that we need to execute this command:

php vendor/zendframework/zftool/zf.php create module Alubm

This will create a Album module with all the required configuration inside the module directory.

Create a Controller

Let’s create a Controller named Album using the ZFTool. To do that we need to execute this command: zf.php create controller {controller-name} {module-name}

php vendor/zendframework/zftool/zf.php create controller Alubm Album

Now configure this controller in the module.config.php with this code:

<?php
return array(
    'controllers' => array(
        'invokables' => array(
            'Album\Controller\Album' => 'Album\Controller\AlbumController',
        ),
    ),

    // The following section is new and should be added to your file
    'router' => array(
        'routes' => array(
            'album' => array(
                'type'    => 'segment',
                'options' => array(
                    'route'    => '/album[/][:action][/:id]',
                    'constraints' => array(
                        'action' => '[a-zA-Z][a-zA-Z0-9_-]*',
                        'id'     => '[0-9]+',
                    ),
                    'defaults' => array(
                        'controller' => 'Album\Controller\Album',
                        'action'     => 'index',
                    ),
                ),
            ),
        ),
    ),

    'view_manager' => array(
        'template_path_stack' => array(
            'album' => __DIR__ . '/../view',
        ),
    ),
);

To monitor your application’s performance you can install Zend Developer Tools. Read more about this tool from here.

Step 5 – Doctrine

What is Doctrine?
Doctrine 2 is an object-relational mapper (ORM) for PHP 5.3.3+ that provides transparent persistence for PHP objects. It uses the Data Mapper pattern at the heart, aiming for a complete separation of your domain/business logic from the persistence in a relational database management system.

What are Entities?
Entities are PHP Objects that can be identified over many requests by a unique identifier or primary key. These classes don’t need to extend any abstract base class or interface. An entity class must not be final or contain final methods. Additionally it must not implement clone nor wakeup or do so safely.

Doctrine ORM Module

DoctrineORMModule integrates Doctrine 2 ORM with Zend Framework 2 quickly and easily.

Installation

To install this module you need to execute this following command using composer

php composer.phar require doctrine/doctrine-orm-module
# (When asked for a version, type `0.*`)

Then add DoctrineModule and DoctrineORMModule to your config/application.config.php and create directory data/DoctrineORMModule/Proxy and make sure your application has write access to it.

[To be continued…]

Virtual Host

What is virtual host?

According to Wikipedia: Virtual hosting is a method for hosting multiple domain names on a computer using a single IP address. This allows one machine to share its resources, such as memory and processor cycles, to use its resources more efficiently.

Setup for Windows Platform

At first let me tell you my setup, I have windows in my C: drive and I have installed XAMPP in my D: drive. For windows platform (with XAMPP) you need to do 3 things. Thing 1: go to your XAMPP installation drive then in my case it is D:, and open the httpd-xampp.conf file. In my case it is located here D:\xampp\apache\conf\extra. Thing 2: Add these lines of code in the httpd-xampp.conf

<VirtualHost *:80>
	DocumentRoot "D:/xampp/htdocs/project/path"
	ServerName yourhostname.local
</VirtualHost>

NOTE: One thing to note here is, the default host (localhost) must be the last host defined in this file, Otherwise worlds will be at WAR!!!. So your final look of the httpd-vhosts.conf file should be something similar to this

NameVirtualHost *:80

<VirtualHost *:80>
	DocumentRoot "D:/xampp/htdocs/project/path"
	ServerName yourhostname.local
</VirtualHost>

<VirtualHost *:80>
	DocumentRoot "D:/xampp/htdocs"
	ServerName localhost
</VirtualHost>

NOTE: If you have installed xampp in your windows root directory then you might be unable to save the edited file. In that case open the notepad in admin mood (Run as administrator) by right clicking on its icon. Then open the file from within notepad by selecting File > Open... Thing 3: You need to register your custom domain (in my case it is yourhostname.local) in the window’s host file. As I have my windows in C: drive so my host file locates here C:\Windows\System32\drivers\etc. Now read again what I said in my last NOTE point and then open the host file using notepad by following that instruction. In that host file, add this line, DON’T delete any existing lines in that file (yeah that’s common sense!).

127.0.0.1        yourhostname.local

and Save the file. and One More Thing: OK I admit it is now becoming 4 things, so Just restart your apache server very quickly by selecting XAMPP control panel. If it fails to restart for some unknown reason just restart your PC.

Setup for Linux Platform

For Linux, it is quite straight forward. Step 1: Add a sites entry in this directory /etc/apache2/sites-available. If you don’t know how just copy the default as yourhostname.local

$ sudo cp default yourhostname.local

Step 2: Open your newly created site file (In this case it is yourhostname.local) with any linux editor, I’ll use VIM.

$ sudo vi yourhostname.local

Then add the following lines of code then save and close.

<VirtualHost *:80>
    ServerName yourhostname.local
    DocumentRoot /home/username/yourproject/path
   <Directory /var/username/yourproject/path>
       DirectoryIndex index.php
       AllowOverride All
       Order allow,deny
       allow from all
   </Directory>
</VirtualHost>

Step 3: Register the host in the /etc/host file

$ sudo vi /etc/host

Step 4: Enable the new host with this command

$sudo a2ensite yourhostname.local

Step 5: Restart apache server. Command for this is

$ sudo /etc/init.d/apache2 restart

Or

$ sudo service apache reload

That’s it for now. Thanks.

Composer

Composer is a tool for dependency management in PHP. It allows you to declare the dependent libraries your project needs and it will install them in your project for you.

The problem that Composer solves is this:
a) You have a project that depends on a number of libraries.
b) Some of those libraries depend on other libraries.
c) You declare the things you depend on.
d) Composer finds out which versions of which packages need to be installed, and installs them (meaning it downloads them into your project).

System Requirements:
Composer is multi-platform and we strive to make it run equally well on Windows, Linux and OSX.Composer requires PHP 5.3.2+ to run.

you can read more about composer form http://getcomposer.org.

NOTE: For many operation composer depends on Git, so make sure you have git installed on your system. For windows platform make sure Git is on your environment path, and git is available on command prompt.

Installation – Linux or *nix Platform

To actually get Composer, we need to do two things. The first one is installing Composer (again, this means downloading it into your project):

$ curl -sS https://getcomposer.org/installer | php

This will just check a few PHP settings and then download composer.phar to your working directory. This file is the Composer binary. It is a PHAR (PHP archive), which is an archive format for PHP which can be run on the command line, amongst other things.

Installation – Windows

Download and run Composer-Setup.exe, it will install the latest Composer version and set up your PATH so that you can just call composer from any directory in your command line.

After installation we can use the composer with this command

php composer.phar

Ok That’s it for now. Thanks.

How to unblock the internet using proxy

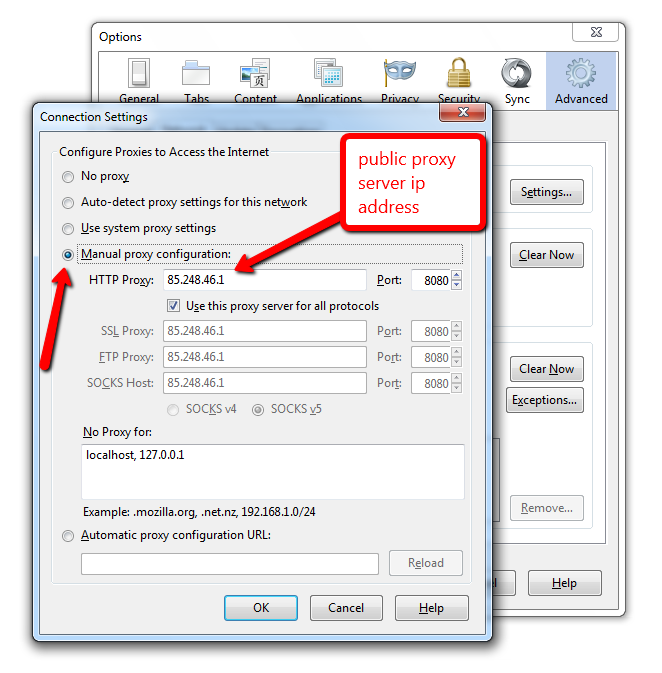
Step 1: search on any unlocked available search engine with this term “free public proxy server ip”, you will be looking for a website that lists public proxy server ip, for example: http://www.cool-proxy.net/proxies/http_proxy_list (choose the highest download speed) copy IP Address and Port

Step 2:  Click Options -> Options

Step 3: Click  Advanced -> Network -> settings

and finally Step 4: paste IP Address and Port that you copied at step 1

Click OK and restart browser. Enjoy the free world!

GUI Client tool for Closure Compiler

Google built some excellent tools for JavaScript development. One of them is the Closure Compiler. A common development scenario is at the end of every project when we finally deploy the code in production we usually minify and merge all .js files into single or fewer numbers of files. To do this I normally use Closure Compiler, but there is a small problem like if you use the closure compiler’s online version you can’t actually minimize the .js files on your local machine, there is of-course a offline version of the compiler but you have to use that from command line, and which is not much user friendly specially if you are in a hurry or not using any automated build tool, So I decided to fill this gap, and built this GUI wrapper for the great Closure Compiler.

You can use this from your pc, to run this you will need java (jre) in your pc, i built this using java 7 so earlier versions of java will NOT be able to run it.

Download:

No installation required just download and click. Grab the tool from here, the jar version is for all operating system, but i also built an exe of it but it will still require java. (jre 7)

How it works:
At first i tried to reverse engineer the whole compiler just like i did for the css-minimizer but well its a huge thing, thousands of Classes inside it. I felt lost, but there was a easy way out, Google provides a REST api for it, and I decided to use it. So that means this GUI tool can’t work offline (unless you select the merge option), when you select .js files and press the compile buttons it merge all the js files and requests Google and then saves the response.

One important thing, closure compiler checks for errors and warning. So if there is any error or warning in your JavaScript it will be included in to the response. So always check the compiled file before including into the project.

Tips: Hold Ctrl button to add multiple JavaScript files in the list.

Okay now try it. and give me feedback and suggestions. Thanks

GUI tool for Google Closure Compiler
Requires Java 7 to run.

Bangla Pad Updated

Bangla Pad 2.0 Released!!. It contains few new features like better font, undo/redo, save and Save as.. now works correctly, also it now has a context menu for copy/paste.
Download BanglaPad / Download Java
————————————————–
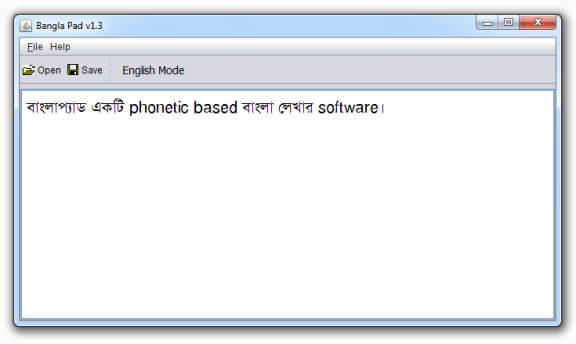
Bangla Pad 1.3 Released!!. It contains some minor bug fixes. Please update if you are already using any prior version.
————————————————–
I wrote a software few years back to write bangla easily with phonetic based layout. It was working good till now, though it had few issues with this new update i tried to resolve most of them.

Beside fixing the issue with this new update i embed the Unicode font with it, so now any computer without a bangla font can now write bangla with it. Read the full description here.

You can get it from here, no installation required just download and run. Only thing just make sure you have the jre 1.6.0_33 or later 

Key Layouts: (For writing join character use the + sign) For any question about any specific spelling or character please feel free to ask me in the comment section.

অ → ao
আ → A
ই → I
ঈ → II
উ → U
ঊ → UU
ঋ → WR
এ → E
ঐ → Oi / OI
ও → O
ঔ → Ou / OU
ক → k
খ → kh / K
গ → g
ঘ → gh / G
ঙ → Ng
চ → c
ছ → ch / C
জ → j
ঝ → jh / J
ঞ → NG
ট → t
ঠ → th
ড → d
ঢ → dh
ণ → N
ত → T
থ → Th
দ → D
ধ → Dh
ন → n
প → p
ফ → ph / f
ব → b
ভ → bh / v
ম → m
য → z
র → r
ল → l
শ → sh
ষ → S
স → s
হ → h / H
ঃ → HH
ং → ng
ঁ → ^ / NN
ৎ → tt
া → a
ে → e
ো → o
ি → i
ী → ii
ু → u
ূ → uu
ৈ → oi
ৌ → ou
্ → + / w
ৃ → wr
৳ → $
ক্ষ → k+S
হ্ম → H+m / h+m
দ্ম → D+m
জ্ঞ → gg / j+NG
ঞ্জ → NG+j
ষ্ণ → S+N
ফ্ট → f+t
হৃ → Hwr / hwr
হ্ণ → H+N / h+N
হ্ন → H+n / h+n
ক্স → x / k+s
——————————
কৃষক → kwrSk
চট্টগ্রাম → ct+tg+ram
মধ্যাহ্ন → mDhYaH+n
অপরাহ্ণ → aopraH+N
হৃদয় → HwrDy
সহিষ্ণু → sHiS+Nu
অঞ্জন → aoNG+jn
বিজ্ঞান → biggan / bij+NGn
ব্রাহ্মণ → b+raH+mN
সহজ → sHj
বাংলা → bangla
ঐতিয্য → OiTizY
কোদাল → koDal
চাঁদ → ca^D
ব়্যাব → rYab
কার্য → kar+z
কক্সবাজার → kxbajar
পদ্মা → pD+ma
গঙ্গা → gNg+ga
ঈদ → IID
সফ্টওয়্যার → sf+tOyYar
মৃত্যু → mWTYu
Bangla Pad version: 1.3

CSS Minimizer

Update 5 April 2012:
One more algorithm added. Now CSS Minimizer is powered by Closure Stylesheets Compiler developed by Google.
————————————————————————————–

In my earlier days when I was very new, i worked on some amazing web apps, those are still running, because as i am learning more and more everyday I continuously updated those project’s back-end  code with the technique that was best at that time in my knowledge. But problem remain with the front end, because I can’t replace the front end with fully new layout because its a huge task, to update the layout when i opened the CSS file i felt lost, the front end css i wrote then was horrible, and with continuous tweaking css became huge in size and tons of duplicated rules.

So I decided to make a CSS optimizer or minimizer whatever you call it. Its a two part project I just finished the first part. You can try it here http://css-min.appspot.com. Second part is a site analyzer, that will analyze the whole site and tell you which CSS selectors are obsolete (pretty amazing huh?!)

How CSS Minimizer works:

It takes a css url then it grabs that css for analyze. The analysis proses is somewhat complex but to say in simple way “it reduces all duplicate rules”. Unlike other css minimizer it just doesn’t remove the white-space and newline character but it rewrites the whole css in a very optimized way.

For example:
Suppose this is your original css:

.sel_a{font-family:'arial';font-size:10pt;}
.sel_b{font-size:10pt;}
.sel_c{font-size:10pt;letter-spacing:1px;}
.sel_d{padding:0;margin:0;}
.sel_e{font-weight:bold;text-decoration:underline;}
.sel_f{font-family:'verdana';}
.sel_g{font-weight:strong;font-size:12pt;}
.sel_h{font-weight:strong;font-size:12pt;}
.sel_i{font-size:13pt;}

Minimizer will rewite it this way:

.sel_g,.sel_h{font-weight:strong;font-size:12pt}
.sel_i{font-size:13pt}
.sel_d{padding:0;margin:0}
.sel_c{letter-spacing:1px}
.sel_f{font-family:'verdana'}
.sel_e{font-weight:bold;text-decoration:underline}
.sel_a{font-family:'arial'}
.sel_a,.sel_b,.sel_c{font-size:10pt}

Look carefully how the selectors have been rewritten by minimizing the duplicate rules.

In minimized CSS ofcourse white-space, newline character, comments etc those will be removed.

CSS minimizer can’t dramatically reduce the amount of code like JS minimizer, because we can’t rename the selectors or style rules, but you can follow some techniques for that like use shorter class, ID names, never use long nested selectors AND of-course always check your css with CSSLint (an Amazing tool).

I hope you will find this tool useful. Please do comment and give me feedback here, that will help me to improve this tool.

NOTE: As this is the alpha version of this minimizer, there are few known issues with of-course with some unknown issues too. So i recommend take cautions before using its minimized css with your production level code.